Showing posts with label simple toys. Show all posts

Tuesday, January 12, 2016

A Custom Doll


A custom doll for a dear reader's little girl. She is 12.5 inches tall, made of organic cotton Swiss jersey skin fabric, firmly stuffed with 100% organic wool. Her face was sculpted using a combination of traditional waldorf doll making techniques and needlefelting. Her hat is made from softest, cuddliest 100% cashmere, and her blond hair is from 100% organic lambswool. Her eyes (which are quite beautiful, if I do say so myself) took forever and a half to embroider! Her wardrobe consists of a pair of tiny bloomers edged in vintage lace, a dress made from coordinating cotton fabric with a matching bias neckline, and a sweet little linen/cotton blend pinafore with a matching pocket. I have to finish up a few tiny details, and she should be heading for her new home in a day or two!

Sunday, September 14, 2014

Rice play and mosaics


On Friday we had some friends over to play. I had just colored a bunch of rice, so as soon as it had cooled from drying in the oven I set it on the table in reach of the little ones. It was a matter of minutes before Emmett had run back to his bedroom and brought out a collection plastic and wooden animals and invited his little friend to play "Farm" with him. She thought that was a great idea! Claire wandered through after a while but didn't stay for too long. Elowen and Emmett however, played for about 45 minutes with the colored rice and the animals. When they finally wandered away to play something different I printed several simple coloring pages onto card stock and put out glue and lots of different colors of rice and beans and seeds to work with. Pretty soon the kids came back through the kitchen and saw everything set up differently. I explained what a mosaic was and showed them how to do put the seeds onto the glue to color their pictures. The bigger kids did everything themselves while I helped the little ones by applying the glue for them, and they did the rest on their own. They had a great time! The clean up really wasn't too bad. I just raked all of the spilled rice and seeds etc. off of the table onto the floor and swept it all up when they where done!

Thursday, February 13, 2014

New Window Star Tutorial with printable pattern


I love making window stars out of kite paper. The way they seem to glow as the light shines through the translucent paper is almost magical. I've been wanting to share this wonderful new kind of window star with you for a while now, and with the end of winter nowhere in sight at the moment, today seemed like a great time to do it! (Is it just me or does this winter really seem to be dragging on and on and on. My husband and mom assure me that I feel like this every February.) Well, I guess that is why I enjoy my pretty window stars even more at this time of the year. They give us something bright and happy to look at when almost everything outside of our windows is grey and cold and hibernating.


♥Our Valentine inspired window star♥


For this tutorial you'll need paper. Each star is made from 10 individually folded stars. We used this kite paper from Palumba, but many natural toy retailers carry it. (Not an affiliate link, just informational!) You'll also need a copy of the pattern I drew up.  (The link for the pattern is {now*}at the end of this post.) I've included 2 sizes for the pattern so if you have the 6.25 inch square kite paper like we do you can simply print out the pattern and the largest size can be used with a whole sheet of paper with the least amount of waste possible. The smaller sized pattern has been made to work perfectly with the same size paper that has then been folded into quarters to make approximately 3 inch squares. And lastly you'll need a pair of scissors and a glue stick. 


First you'll need to cut our your pattern and then cut out 10 pentagon shapes for each window star you'd like to make.


Matthew helped me make our stars. This is a great project for bigger kids. 


After you have your pentagons cut out you'll need to make the creases for your stars. I've included lines on the patterns to show you where to fold the stars.


Next you'll need to make a small cut into the center section between each of the points of the star.


Fold each of the flaps you created on each point inwards to turn your pentagon into a star. 


Once you have all 10 stars folded you can decide how you want them to be arranged in you window star.


Next you'll need to place the star (flap side up) with one point facing you and 2 points facing away from you. Then you'll need to open  up one flap on the top left point as shown above and then fold up the bottom point of the star so your window star will have that lovely wreath shape. Repeat those steps with all of your stars. 


Now look at the picture above. You'll need to take the unfolded flap and tuck it behind the star to it's left. the point just below the one with the flap will then be tucked under the folded up point of the star to the left. Once you have those in place you'll want to fix them there with a bit of glue. (I really do find that glue sticks work wonderfully with this kind of paper)


Continue following the last steps connecting all of your little stars to form the big one. 


Once your window star if formed, you can glue down each of the folded up flaps. If there are any remaining flaps that don't seem to want to stay folded down you can glue them into place as well. Sometimes I do, but if they are staying nicely in place I don't worry about it. 


TaDa! You can now hang your beautiful star in the window for the light to shine through. (We use a bit of glue stick to hang our stars. It washes off easily with a bit of warm water when your ready to take them down.) 


Aren't they lovely?! I just love bright happy things. And these window stars make our winter view so much more cheerful! 

You should be able to open it and print it out onto a full size piece of paper to get the appropriately sized pentagons for your stars. 
Somehow I got distracted just as I was going to publish this post this morning and forgot to include the pattern link...oops! But now it's fixed...so that's good! 

Sharing with Linda for Creative Friday and Skip to my Lou.

Monday, January 6, 2014

Epiphany~ The Kings have come to worship Him


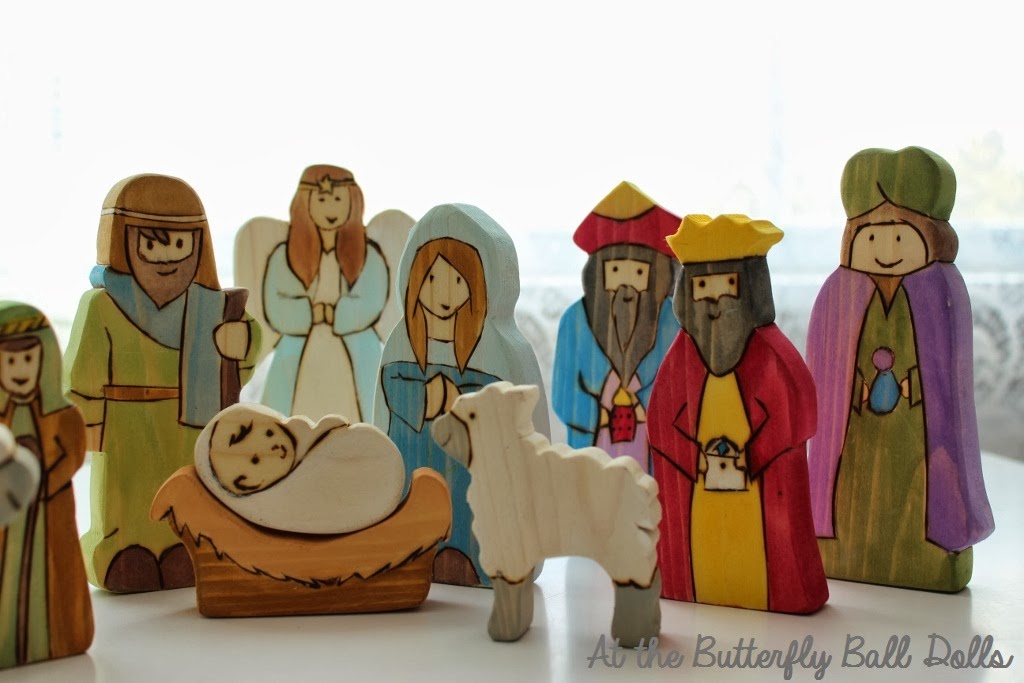
I just realized as I was contemplating the taking down of our Christmas decorations that I had forgotten to show you the wooden nativity that I had made for the little ones to play with. I posted a preview when I had cut everything out and sanded it back in September, here. I did decide to both wood burn the details and paint them with a nice watercolor wash after all.

Claire and Emmett both really enjoyed playing with the little wooden figures. We have several beautiful picture books depicting the story of the birth of Jesus. I was asked to read one or several of them almost daily over the past month or two. After  we read the story they would climb down from the sofa and go over to the little table where we had the nativity figures and the would play with them telling each other the story and acting out the parts with the wooden dolls. Claire did request that I make a "bad king" (Herod) for her to use next year. :-) Ours will be the only nativity scene I've ever seen complete with a king Herod!

The stable didn't get made for them this Christmas, I had great intentions, but like so many other things this fall and winter I realized that I simply couldn't do it. I have really enjoyed this Christmas season so much more because of that. It didn't feel like laziness, it felt good and relaxed, like I was keeping my priorities straight and not trying to "do it all". Instead of driving myself mad trying to get everything finished and have all handmade gifts for each of my children, and baking cookies for all of our friends and neighbors, and hosting a party for our homeschool group; I chose to cuddle with my kids and breathe in that sweet new baby smell. We played games and read stories, sang Christmas carols, and watched a few Christmas specials on TV.  I made exactly one batch of homemade cookies and that was it. And you know, my children didn't seem to mind one little bit. There was pretty much zero pinterest worth crafting for or with kids happening, and the meals were (mostly) wholesome and yummy and humble, nothing fancy and time consuming was attempted. And the house, it was not spotless! And I completely enjoyed it all! I rested and recovered and just was "there".

It has truly been a wonderful Christmas season. On Christmas morning my sweet Claire woke up to find her stocking filled and a beautiful present for her under the tree. She was so excited! After about half an hour I mentioned to her that we needed to get out of our pajamas because we were going to Grandma and Grandpa's house to spend Christmas there. She immediately ran to Emmett and told him "Emmett we have to get dressed, we're going to have a birthday party for Jesus with Grandma!" ♥ She had no expectations of anything for herself, she was just happy because we were celebrating Jesus' birthday. My sweet girl, she melts my heart!

Monday, December 16, 2013

In which a doll is born


Our sweet little Claire turned 4 years old this weekend. During the last month of my pregnancy I began working on a special doll for her, a baby doll. I knew I wanted it to look a bit like her new baby sister that was on the way. So with that in mind I set to work. I created a doll with arms and legs that are jointed and can move, to make dressing easier. Plus her new baby would be able to sit up and hug and do all of those fun things you need movable arms and legs for. I embroidered her baby's eyes to match Claire's own eye color as closely as possible. We had a very clear ultrasound picture of Violet at 36 weeks and her face shape was just like Claire's was as a newborn, so I carefully sculpted the new doll's face to have a sweet pointy chin, chubby kissable cheeks and a darling little nose, just like my sweet girls. Her skin is organic cotton, and her hair is a mohair and wool blend. It was a natural white, and we gathered black walnuts from our woods and I dyed her hair with them after I crocheted the little cap to the correct size for her head. She is firmly stuffed with wool. 

Ever since Violet was born 3 weeks ago, Claire has been watching everything I do with the new baby very closely. Doll play in our house has become much more serious business now! Claire has spent the past couple of weeks playing "mommy with a newborn". She mentioned how she wished one of her babies had short soft fuzzy hair, like my newborn. She also told me several times that she would like to have diapers for her baby, so she could change it's diapers. (Lately a very frequent occurrence that she has witnessed about a million times around here!) So I made her new baby a couple of diapers that close with velcro. The diapers turned out to be a very big hit! Claire's baby has had her diapers changed even more frequently than her baby sister's in the past few days. During the time I worked on the doll, Claire had no idea that I was making something for her! She was so surprised to open up her gift on her birthday

With everything that has been happening over the past few weeks I gave myself a break and decided not to make her handmade clothing right now. So she is being dressed in "real preemie baby" sized clothing for the time being. The little pale blue pixie hat with velvet ribbons and the embroidered violets on it was borrowed from my own little Violet Penelope! I made it from the softest cashmere sweater. The pink hat with matching tiny Mary Jane shoes were actually Claire's when she was a newborn! They were made for her by her adoring Grandmother!

Claire and I decided to wrap our new born babies up in their blankets and take pictures of them together. Playing Mommy with my sweet little girl is so much fun. 

Joining in with Nicole at Frontier Dreams today and Linda at Natural Suburbia

Related Posts with Thumbnails